

Do you find yourself struggling while playing guitar? Does the guitar feels too stiff in your hands, and the strings feel hard to press? It might be due to several reasons, instrument issues, environmental issues, or even problems with your practicing method.
If your guitar strings feel too hard to press down, it might be due to a high string action (the distance between the strings and the fretboard), thick or rusty strings, tall frets, warped wood, truss rod issues, dangerous humidity levels, or simply the lack of practicing.
In this article, you will learn how to assess what is causing your guitar strings to feel stiff and hard to press and how to solve some of these issues. Let’s start with the simple ones:
Take your guitar to a setup!

If the strings on your guitar feel a little too stiff and you’re wondering why it is happening, it is safe to assume that you are a beginner and that the guitar you own might have never gone through a proper setup. Therefore, the easiest (and recommended) thing to do in your situation is to take your guitar to a guitar technician for a proper setup.
A guitar technician’s job is to make sure your guitar is functional and comfortable to play. Make sure to have a little chat with him about what is comfortable for you (action and string gauge) as it varies from one player to another.
Practicing and developing calluses

If your guitar strings feel hard to press, one of the first things you should ask yourself is whether you practice enough. After enough guitar playing, your fingertips will develop calluses which are areas in our bodies that develop thickened skin as a response to repeated friction.
With more practice, the clamping power of your chord-holding hand will also grow stronger, and holding these bar-chords will be much easier, though It’s important to point out that experienced guitar playing is about precision and not sheer power.
Advice for beginners:
- Try other guitars. This is the best way to find out where the problem lies. If other guitars feel better in your hands and easier to play, consider sending your guitar to the local luthier, and if other guitars are hard to play as well, put more time into practicing.
- Make sure to press between the frets and not on the frets. It is fairly simple, and you’ll get used to it after a week or two of practicing.
- Don’t worry if your skin cracks and peels off because this is how your body will develop calluses.
- If you are a complete beginner, there is a good chance you might have tuned your guitar too high. Make sure to tune the strings to the proper height: E-B-G-D-A-E (from the high bottom string to the low upper string).
Using a tuner is highly recommended! There are tuner pedals, tuner devices, clip-on tuners, and tuner apps. All of them are good and will serve the same purpose.
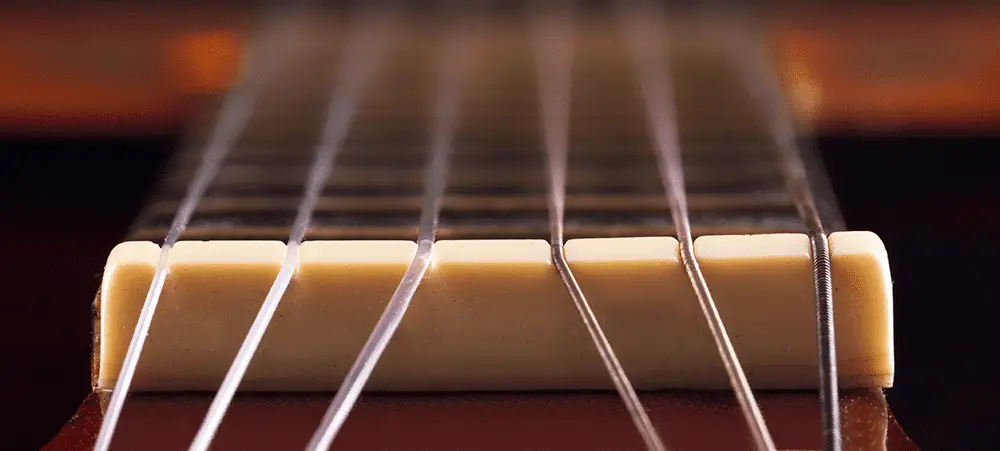
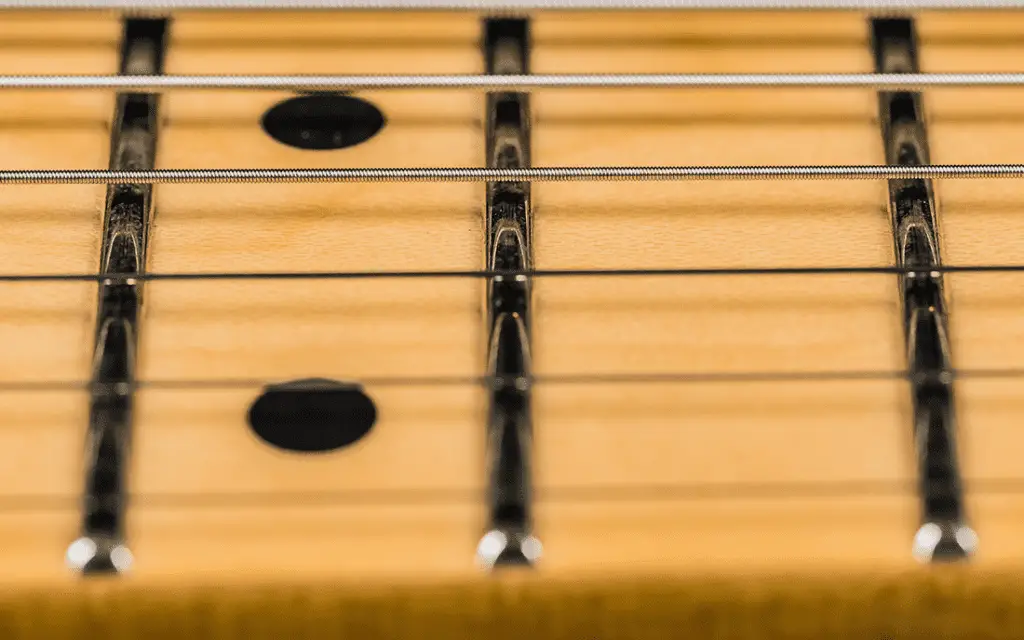
High action
The guitar’s action is the distance of the strings from the fretboard and will usually be the main reason why your guitar strings are hard to press. A high action means that the strings are farther away from the fretboard and a low action means that the strings are closer to the fretboard. The nut slots depth and the bridge/saddle height will determine the overall action of the guitar.
How to check if your guitar action is at an optimal position:
- press on the fret that divides the guitar string in half (usually around the 12th fret).
- Look at the adjacent frets. There should be almost no gap between the string and the fretboard, just a little room for the string to tremor without hitting the fret and creating a buzz.
- If this gap looks a little wide, it might be due to high action, and you should consider lowering it.
You’ll need to adjust either the nut slot depth or the bridge/saddle height if you want to treat the guitar action, but make sure the guitar neck is positioned correctly before doing so. Continue reading for more information on how to do that.
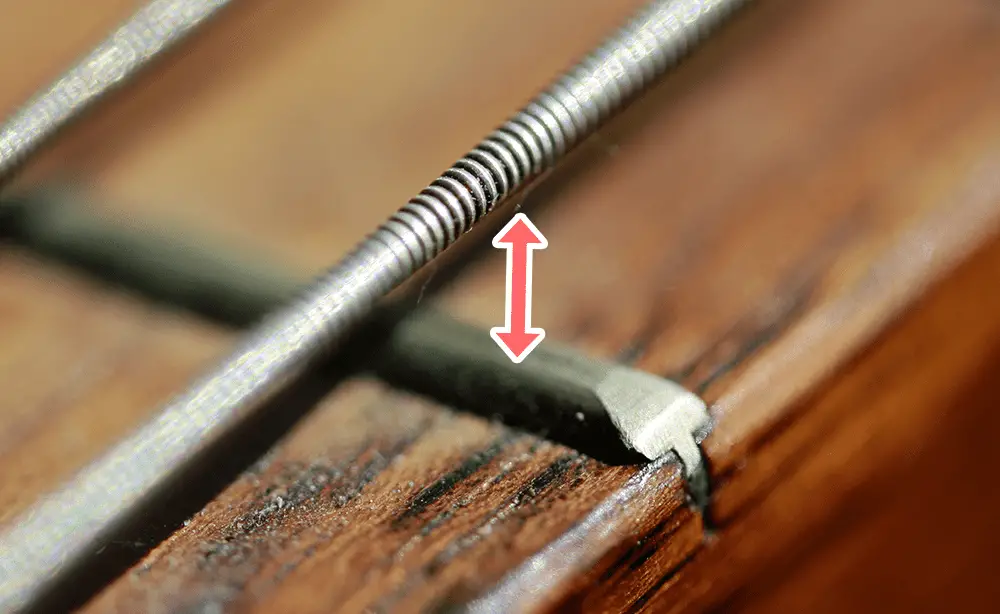
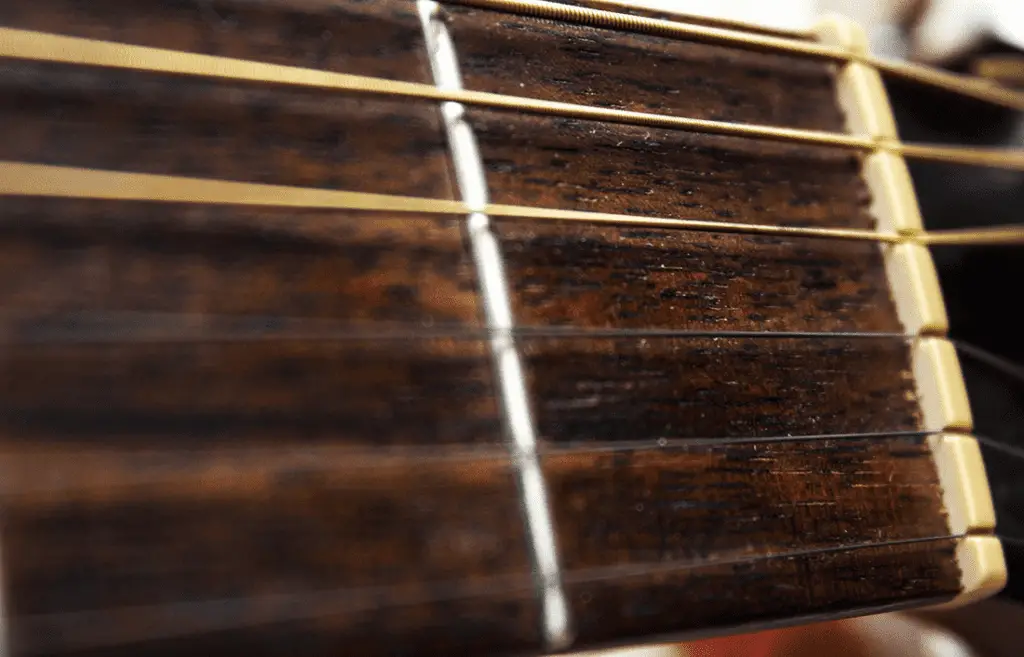
Nut slot depth
As mentioned before, strings that are hard to press might be positioned a little too high over the fretboard. One of the factors that determine your guitar’s action is the depth of the nut slots.
How to check if the nut slots are deep enough or too shallow:
- Press the third fret and look at the gap between the string and the first fret. There should be a space as wide as a business card at that spot.
- If the gap between the string and the first fret is bigger than 0.16in (business card width), you should deepen the nut slots.
- If the slots are already too big, fill them with bone dust/baking soda and glue.
- Remember that the clearance between the string and the first fret is the issue and not simply the depth of the nut slots. Make sure to shave off the top of the nut only after setting the depth of the slot.
Tools for the job:
saddle/bridge
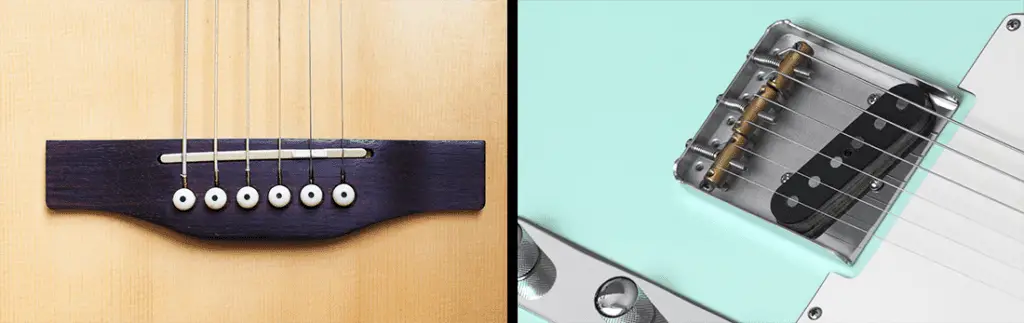
The height of the guitar bridge and saddles also plays a part in determining your guitar’s action. If the strings sit too high over the fretboard, they might feel a little stiff to play, and if they sit too low, the string will buzz.
Make sure the guitar neck is positioned correctly before proceeding with saddle/bridge adjustment, and use a new set of strings when doing so.
How to adjust a guitar’s bridge and saddles:
- First, check the radius of the bridge compared to the neck radius. It will have a significant effect on the middle strings (G and D), they will buzz if the radius is too flat and will be poditioned too high if the radius is too tight.
Electric guitar – If the radius of the bridge/saddles does not match the neck, adjust the individual saddles.
Acoustic guitar – you will have to dismantle the saddle and sand it down to the correct radius using radius blocks (to add material to your saddle you can use a piece of hardwood or even a piece of paper).
A small radius difference between the saddle/bridge and the neck is acceptable like the difference between a 9.5 inch to a 10 inch or the difference between a 10 inch to a 12-inch radius. A difference between a 10-inch radius and a 20-inch radius would be too high and will require some adjusting. - After adjusting the bridge/saddle radius, you can address its height. Most electric guitars have a bridge/saddle adjustment built-in them while the saddle of acoustic guitars is made out of a single piece of material. You will have to sand it down in order to lower its height.
To do that, place a piece of 80 grit sandpaper on a flat surface and begin sanding. Apply pressure in different areas of the saddle if you wish to lower only the bass/treble side.
Crooked or warped neck
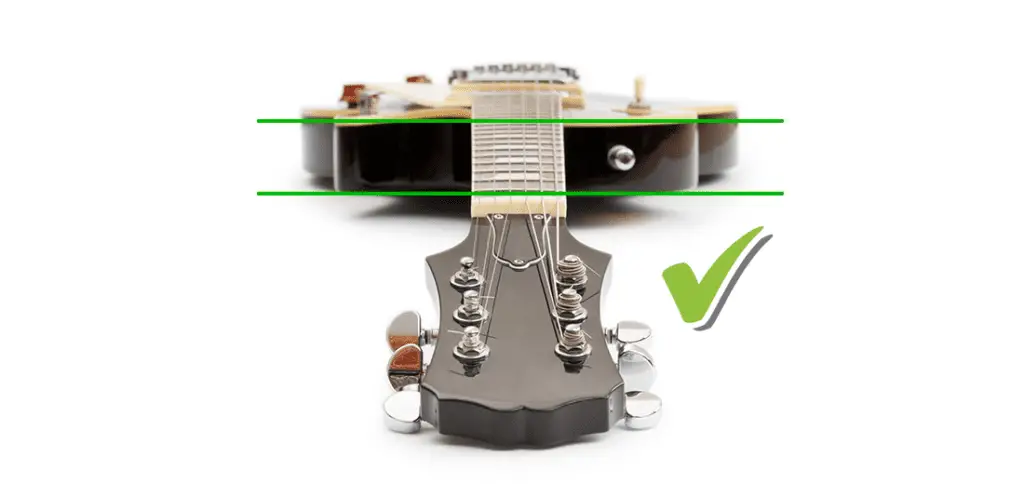
If your guitar’s neck has twisted, it might cause action issues, string buzz, and other setup issues and playing difficulties. This kind of problem is serious and requires professional treatment.
How to know if a guitar’s neck has twisted:
To check if your guitar’s neck has twisted simply lie the guitar flat on its back with the headstock facing towards you. Bend over and until your eyes are leveled with the nut and have a look. Compare the angle of the 12th fret to the first fret. Ideally, they should be parallel. If you still feel unsure, try placing a ruler over each fret to accentuate your view.
Fret height
With new guitars, playing discomfort could be the result of too-high frets. In that case, the frets should be sanded down and recrowned. Sometimes only in a few specific points, and sometimes, if the guitar hadn’t gone through proper inspection before it left the factory, it should be completely leveled.
Unleveled frets could also make your guitar buzz or choke up. If your guitar’s condition requires leveling, it is recommended to take it to a luthier, but if it needs just a minor touch-up in a few places, you can surely do it by yourself, at home. Here is how:
Tools:
Fret rocker
Sanding beam
Straight edge
The BEST crowning file
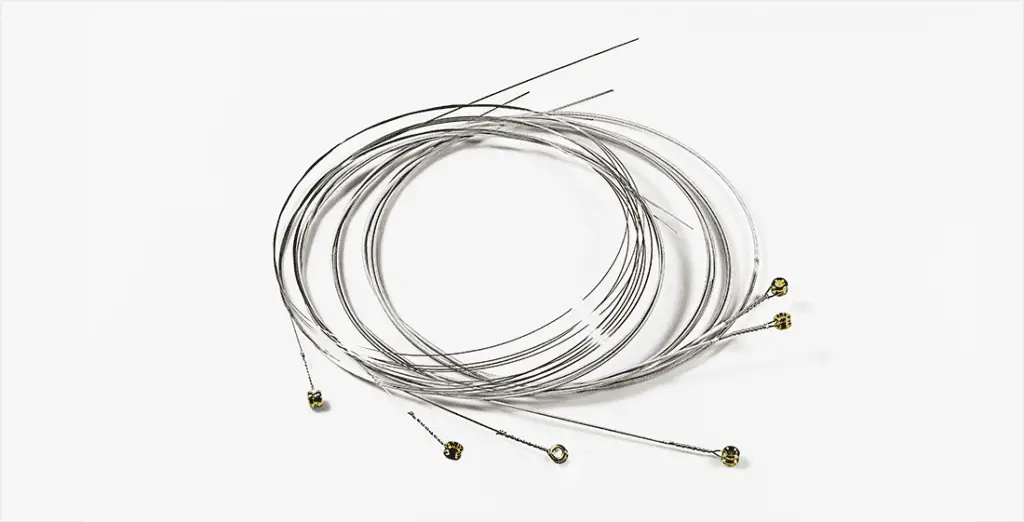
Rusty strings
Rusty and old strings will also affect your guitar’s playability. They are harder to bend and press and will contribute to playing discomfort. Rusty strings will also promote the wear and tear of the frets on your guitar as they will act like tiny saws grinding into your frets faster than smooth new strings.
Try replacing your strings every few weeks (if you are a professional player) and every 1.5-2 months if you’re an amateur.
Truss rod issues
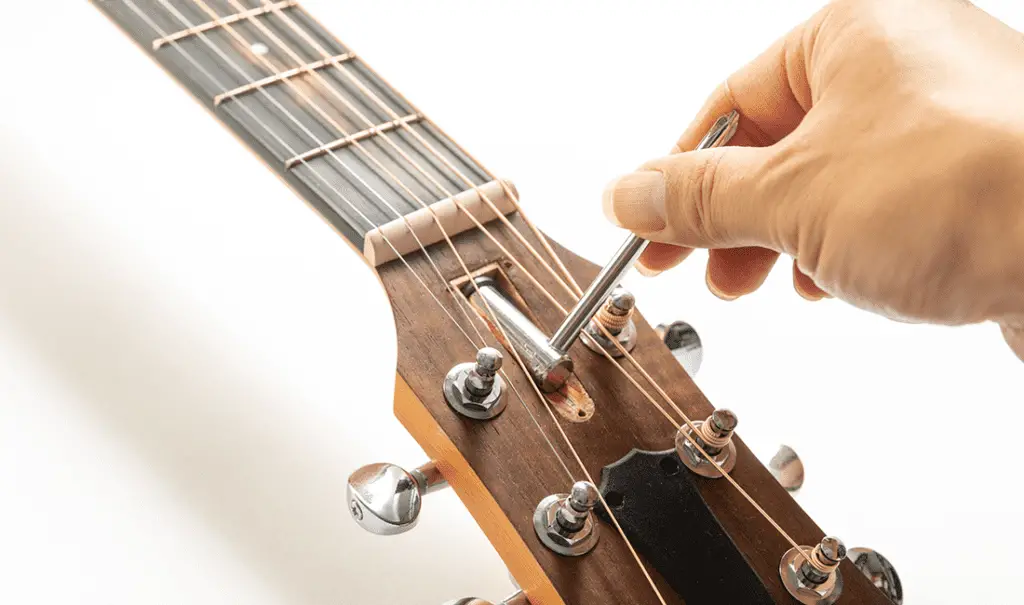
The truss rod is a bending metal component installed inside the guitar’s neck, which controls its curvature. You can tune it by turning a screw located in one of the fretboard’s edges. It is highly recommended not to mess with the guitar’s truss rod if you are inexperienced. It could really mess up the guitar setup, and you can even damage your guitar permanently!
How to check your neck position (back bow/relief) and how to adjust the truss rod accordingly:
- Use a feeler gauge around the 9th fret to determine your neck position. The distance between the fretboard and the strings should be around 0.010 inches.
- If the gap is bigger than 0.010 inches, it may imply an upbow. If the gap is smaller, it may imply a back bow. Don’t forget to consider the bridge/saddle height as well as the nut slot depth while examining a guitar’s neck.
- Tighten the truss rod screw (clockwise) to create a back bow and loosen it to create an up bow (counterclockwise).
String gauge (thickness) and brand
Maybe what you need is to switch down to a lower string gauge? It might sound a little too simple, but it is a fact that thicker strings are harder to press. Remember to set up your guitar after switching string gauges or even after switching from one brand to another, as different string sets have different thickness combinations. Remember, a guitar should be set up according to string gauge!
The standard recommended string gauge for electric guitars (rock/pop) is 010. You can go down to 009 or even 008, which will bend more easily but sound thinner and break faster. The standard recommended string gauge for acoustic guitars is 011/012. Going with a lower string gauge will significantly impact the guitar’s sound and make it sound thinner.
String brand also matters. Certain string brands, especially ones that last longer (like Elixier, for example), tend to feel much harder to play, so make sure to pick a softer pair of strings like Earnie Ball or Daddario.
Humidity

High or low humidity levels can significantly affect your guitar shape, sound, and playability, especially if it is a classical or an acoustic guitar. The high humidity levels in summer can make the wood of your guitar warp, while low humidity levels in winter can make the wood of your guitar crack.
Low humidity can result in cracks in the wood, the sinking of the guitar saddle and low action, and even a complete separation of the bridge from the rest of the body. On the other hand, high humidity levels can cause swelling of the guitar body, which will make the bridge rise, resulting in higher action.
The optimal humidity level for guitars is about 45%-55% relative humidity (RH). You can monitor humidity levels in your studio using a hygrometer (humidity meter) or even the levels inside your guitar case using a wireless sensor (that can even send notifications to your phone when humidity levels get too dangerous). There are also regular humidity packs for guitars that will keep the humidity levels in your case at the optimal range.
A little guitar hack – detune your guitar down by a half step

If you want to soften your guitar strings, you can tune them down by a half step and release a bit of the pressure. Your guitar will feel much softer to play and reach a fantastic new range. It might slightly affect the guitar setup, and you will have to remember that E is now Eb, A is now Ab, et cetera.